Installing Your Foot Rail
     
|
You're never alone when installing your foot rail or any other product we offer. If you need assistance, simply call 877-747-2457 and a product specialist will guide you through every step of installation.Before shipping, we visually inspect your order to be sure that nothing leaves damaged or malformed. Therefore, you should never need to apply excessive force to install a fitting or bracket. Nevertheless, metalwork fabrication and production incorporates processes that can leave burrs and rough edges. Although we do our best to minimize such issues, always wear protective gloves and eyeglasses when working with metal. It's also a good idea to check for proper fit of brackets and other components. If necessary, you can use a metal file, steel wool or sandpaper to smooth any rough edges or protrusions. If you're having any difficulty at all, PLEASE CALL US. We're happy to assist you with installation and help you avoid scratching or damaging the tubing or components. Installing your bar rail is a relatively easy task. You may need a few basic tools which you probably already have or can purchase at most any hardware store. In most cases, just a pencil, drill, screwdriver, pliers and some household glue will do. Other tools you may need include:
|
|
Most applications will NOT require you to cut your tubing. The tubing may be cut with a hacksaw, band saw or chop saw fitted with a fine metal cutting blade. When cutting by hand, we suggest using a miter box. Regardless of whether or not you use a power tool or hack saw, a sharp blade will make your job significantly easier and produce better results. Stainless Steel is a particularly hard metal that will require a special cutting wheel/blade or band. Take your time and cut SLOWLY. File smooth any sharp edges or burrs. |
|
If you have a kit with 3 or more sections, simply remember that two of the sections (outer sections) will typically be longer than the others. This is done to achieve more consistent bracket spacing after insetting the outer brackets . THE LONGER SECTIONS ARE ALWAYS PLACED AT OPPOSITE ENDS OF THE BAR RAIL. If your tubing comes in sections, you’ll be using splices. To insert splices into tubing sections, simply squeeze the splice with your hands or a pair of channel lock pliers until compressed enough to insert… then insert splice half way into tubing and release. Repeat for other end of splice. Compress only enough to permit insertion -- Do not compress so much as to bend splice. Steel sleeve or PVC splices may also be used and come with your order. If you are supplied with steel sleeves or PVC splices, no compression is necessary to slide into the tubing. In order to save shipping space, your order will often arrive with the splices inserted inside of the tubing. To keep tubing from twisting and affix splice, simply place a bead of acrylic caulk on inside of tubing sections, insert splice and twist to spread the caulk. |
|
If required for your installation, use your hacksaw, chop saw or band saw to cut the foot rail tubing to its proper length. To achieve uniform bracket spacing that will permit you to cover any seams, always cut equal amounts off of each tube on a given side. If using a hacksaw, you may want to use a miter box for the best cut. File off any burrs after you finish cutting the tubing. If your tube is in sections, you’ll want to make your cuts on the end at which you’ll be placing the internal splice whenever possible. This will permit you to hide your cut under a bracket. If possible, maintain factory cuts where tubing will be connected to flush fittings. |
|
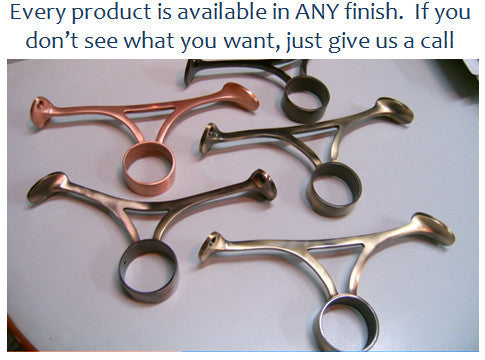
Position and install the brackets . The brackets should be placed no more than 5’ apart and should be spaced as evenly as possible.For the best look, do not place brackets at the very ends of the tubing. We recommend an inset of 4”-6”. This spacing and inset is only a guide and personal preference and aesthetics should be considered, as well. Screw the mounting brackets in place. Keep the position of any seam in mind when installing the brackets. You'll want to be sure that there's a bracket accurately positioned to cover each seam where one tube connects to another. Use screws, supplied by 4Rails.com, to attach brackets to bar or floor. 4Rails.com provides ONLY wood screws for bar face and floor mounting. If your application requires attachment to metal, concrete, cement, stone or any material other than wood, you must obtain the proper type of screw for your application. A wide variety of screws with the proper screw head are available at most hardware stores. If necessary, simply paint the screw heads with a matching color to the finish you need. Be sure to mark AND pre-drill all screw holes. IMPORTANT: Inspect each bracket for any imperfections. If necessary, use a metal file to remove any burrs on the interior of the tubing loop. Be sure every bracket is plumb and level relative to every other. We strongly suggest using a good level and chalk line. If brackets are at different heights or not in a straight line relative to one another, the tubing will not fit properly. Forcing tubing through a misfitting bracket may damage the tubing finish. BRACKET INSPECTION FOR FIT AND ALIGNMENT IS CRITICAL FOR INSTALLATION. It is important that customer notify us immediately, if a purchased component does not assemble as expected. Any damage caused by trying to assemble misfitting parts is the responsibility of buyer. |
|
Securing the tubing to the brackets Next, place tubing through the mounted brackets. To prevent the possibility of scratching the tubing, DO NOT twist the tubing through the brackets. Rather, gently wiggle the tubing slightly while pushing straight through. Always check the inside of the bracket for any edges that could potentially scratch the tubing. Although we inspect all brackets before shipping, should you find any sharp edges on the inside of the bracket, remove with a metal file or sandpaper. If your tubing is CURVED, consider placing brackets on tubing PRIOR to installing on bar face or floor. Once the tubing is in place and visually satisfactory, mark the tubing while in place by sticking a Sharpee or pencil through the pre-drilled guide holes in each of the brackets. After marking all of the spots on your tubing, slide the tubing a few inches left or right and twist up to expose your marks. Drill tube using a proper drill for the screw size slightly large than the screw diameter. (available at most hardware stores). After all holes are drilled, reposition tubing and use the set screws supplied by 4Rails.com, to attach brackets to tube. The self-tapping screws may be used even if the bracket hole is threaded. Self-tapping screws will assist in creating the threads in the tubing wall but are NOT a substitute for pre-drilling. Failure to pre-drill, especially in stainless steel will result in breakage of screws. If your screws are not self-tapping, it is not necessary that the screws penetrate the tubing. If you specifically requested self-tapping screws, please follow instructions above. Otherwise, set screws like the ones below are included and only require a phillips-head screwdriver for installation. If you prefer, you can also drill a hole into the tubing to accept the screw. The screws provided for this purpose are shown below: #8 screw, 1/4" nominal diameter, 20 threads per inch, 1/2" long. (#8, 1/4-20, 1/2"). 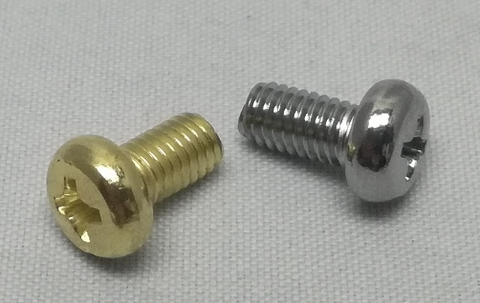
CURVED TUBING WILL REQUIRE YOU TO INSTALL SET SCREWS WITHOUT MARKING AND TWISTING THE TUBING. Finally Apply a SMALL amount acrylic caulk (preferred) or any household glue to the inside of the tubing, and insert the end caps into the ends of the tube . Twist the end cap or finial for better adhesion. Although not typically necessary, a SMALL amount of acrylic caulk may also be used on the inside of the tubing before inserting splices. SCREWS SHOULD NOT BE USED TO ATTACH FLUSH TYPE END CAPS. BALL TYPE ENDS slide over the outside of tubing and may be screwed and/ or glued into place. |
|
Multi-sided bars with attached sides: |
Save Time!
A product specialist is waiting to assist you. 877-747-2457